Oblivion:Varondo
|
|||
|---|---|---|---|
| # of Zones | 3 | ||
| # of Welkynd Stones | 29 | ||
| # of Varla Stones | 2 | ||
| Occupants | |||
| Conjurers, Daedra (1 boss-level Conjurer) |
|||
| Important Treasure | |||
| 1 boss-level Ayleid Cask 01 1 boss-level Chest |
|||
| Console Location Code(s) | |||
| VarondoExterior, Varondo, Varondo02, Varondo03 | |||
| Region | |||
| Colovian Highlands | |||
| Location | |||
| Far north of Kvatch | |||
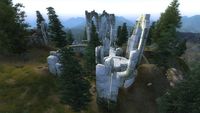
Varondo is a medium-sized Ayleid ruin north of Kvatch containing conjurers and daedra. It contains three zones: Varondo, Varondo Beldastare, and Varondo Varlasel.
Notes[edit]
- Despite unimpressive outside looks, the ruin has a massive interior. Because of the convoluted, multi-level layout, you will generally be detected by many enemies at a time, who will all group up in various areas and attack you. The conjurers summon daedra in addition to the ones that crawl the mazes already, and it can be very hard to single out individual enemies as a result.
- This is one of the few areas in Tamriel that has Dremora spawns, starting at level 5.
Exterior[edit]
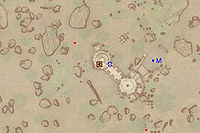
- The exterior is located at coordinates: Tamriel -33, 9
- This location's map marker (M on map) is named Varondo (editor name VarondoMapMarker). The entrance door is W of the marker, 110 feet away.
- 1 Wilderness Creature (Forested Mountains variety) is near the entrance
- 1 Wilderness Creature (Highlands variety) is near the entrance
- 1 Wilderness Creature (Mountains variety) is near the entrance
- The following plants can be found near the entrance: 10 Mandrake plants
Zone 1: Varondo[edit]
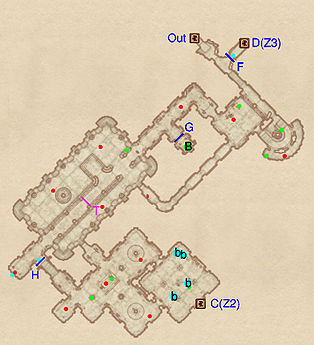
As soon as you enter, you will see the door (D) leading to the third zone on your left. However, this is the door used to return after exploring the dungeon and is blocked by a gate (F on map) that can only be opened from the other side. Although both this gate and gate H claim that they "require a key" to be opened, there are actually no keys to either of these gates: they are opened by stepping on the activation plates in front of them.
Instead follow the corridor heading southeast; as it overlooks the first room you can use it as a sniping opportunity. The stairwell at the end of the corridor hosts two minor loot chests and an enemy, while the aforementioned room has another minor loot chest guarded by one enemy (though another nearby who may also be drawn to the fighting). At this point there are two options: a passage to the south and another to the west. Take the latter and ignore for now the gate at G and the boss chest (B) behind it. You will arrive on a raised walkway with a rare Spiked Barrier trap (T), which you can maneuver around by using the alcove on the right hand side. You can also use your position to snipe the three Daedra stalking the lower level of the room. Once you've made it across the walkway, head to the far wall, dispatch the nearby enemy and activate the push block (cyan dot on map) nearby. Ignore gate H, return to the walkway and jump down to access a minor loot chest and 10 Welkynd stones. Use the northeastern passage to return to the first room and retrace your steps to the walkway, looting the now accessible boss chest along the way.
Open gate H now by stepping on the pressure plate just in front of it. The next room hosts four enemies guarding two minor loot chests, so be ready for a tough fight. Once you're done, heading into the final room, which contains a minor loot chest, two beds and two bedrolls (b) and the door (C) leading to Varondo Beldastare.
Occupants:
Treasure:
- 1 boss-level Chest (Conjurer variety; locked) at location B on map.
- 3 Ayleid Coffers (1 locked)
- 2 Ayleid Reliquaries (1 locked)
- 1 Chest 03
- 1 Restoration Ayleid Chest
- 10 Welkynd Stones, all on the lower level of the large room at T.
- The following potions will always be found: 1 Poison of Slowing
Traps:
- 1 Spiked Barrier trap at location T on map. It is possible to avoid any damage from this trap by stepping into the side area on the north side of the passage. Don't jump down, because then you will miss the switches at the far end that open the gates at G and H.
Doors and Gates:
- There are three doors in/out of this zone
- 1 door (at Out) leads outside
- 1 door (at C) leads to the zone Varondo Beldastare
- 1 door (at D) leads to the zone Varondo Varlasel. This door can only be accessed after you have already been to Varondo Varlasel. It provides a shortcut to return from the end of the dungeon.
- 2 Gates at F and H (both locked, says 'key required' but there is no key). Each of these gates is opened by stepping on the activation plate in front of the gate (indicated by the cyan dots on the map).
- 1 Iron Gate (opened remotely) at G. The activation switch for this gate is at the far (SW) end of the passage (shown by the cyan dot on the map).
Other:
- 2 beds and 2 bedrolls at locations b on map
Zone 2: Varondo Beldastare[edit]
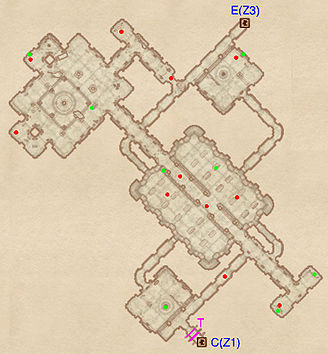
You will enter this room using door C from the first zone, and exit through door E to the third zone. Immediately upon entering you will be faced by two Swinging Blade traps (T) and a patrolling enemy. Ignore the northeastern corridor for now and instead jump down into the room just in front of you and loot the Ayleid coffer nearby. The passage to the north takes you to the lower level of the zone's central zone, where you will find three Daedra guarding two minor loot chests. Note that the enemy on the upper walkway will likely detect you.
Cross the room and take the northeastern passage, which leads to a room with a minor loot chest guarded by an enemy. Return to the main room and this time take the southeastern tunnel, which brings you up to the walkway. Ignore it for now and instead head southeast to an area with two minor loot chests guarded by an enemy. Turn around, cross the walkway and press on to the northwest past an intersection until you arrive in a large room with two enemies guarding two minor loot chests and 7 Welkynd stones. Once you've dispatched them, head to the northeast, past another two enemies until you reach the door (E) to the final zone: Varondo Varlasel.
Occupants:
Treasure:
- 2 Ayleid Coffers (1 locked)
- 4 Ayleid Reliquaries (2 locked)
- 2 Restoration Ayleid Chests (1 locked)
- 7 Welkynd Stones, all in the northwest room.
Traps:
- 2 Swinging Blade traps at location T on map
Doors and Gates:
- There are two doors in/out of this zone
- 1 door (at C) leads to the zone Varondo
- 1 door (at E) leads to the zone Varondo Varlasel
Zone 3: Varondo Varlasel[edit]
You will enter using door E from the second zone. Returning through door D provides a short cut straight back to the entrance in the first zone.
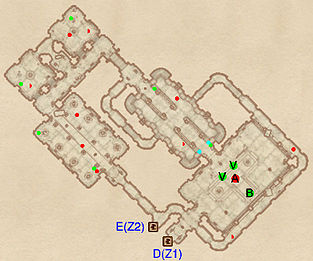
You can immediately access the boss room by heading right from door E, which takes you onto a small stone bridge overlooking the room. You can snipe at the boss-level Conjurer (A) or jump down to face him immediately. However, to claim all the zone's loot and more easily open the two Varla cages at V, it recommended you instead turn left after entering. The first room you'll encounter hosts two minor loot chests (one hidden in the western corner) and 8 Welkynd stones, all guarded by three Daedra. The next area is composed of two nearby rooms, each containing a minor loot chest and guarded by up to three enemies in total.
Press ahead until you reach the walkway which leads to the boss room, but instead of crossing it jump down to the the lower level, where you will find up to two enemies, a minor loot chest and two push blocks (cyan dots on map) which open the Varla cages. Take the eastern passage next, which leads you to a long balcony overlooking the eastern half of the boss room, guarded by up to two enemies. Make your way round and then jump down to claim the two Varla stones at V and loot the boss chest at B. Before returning to the first zone via door D, don't miss the final minor loot chest just at the entrance of the room, near the walkway.
Occupants:
Treasure:
- 1 boss-level Ayleid Cask 01 (Conjurer variety; locked) at location B on map
- 2 Varla Stones (both in Varla Stone Cages) at V. The activation switches for the cages are located in the next room to the northwest, on its southeast wall (the cyan dots on the map). They are at the lower level of the room; the fastest way back up to the Varla Stones is to take the passage from the southwest side of the room and loop around.
- 3 Ayleid Coffers (1 locked)
- 2 Ayleid Reliquaries
- 1 Chest 04
- 12 Welkynd Stones. Eight are in the western room (the first room north of door D) and four are in the central room with the Varla stone activator switches.
Doors and Gates:
- There are two doors in/out of this zone
- 1 door (at D) leads to the zone Varondo
- 1 door (at E) leads to the zone Varondo Beldastare
