Oblivion:Rockmilk Cave
| This place page is currently being rechecked as part of the Oblivion Remastered Project. The page is being checked in several stages to verify any changes due to the release of Oblivion Remastered. All users are welcome to make changes to the page. If you make a change that is relevant to the project, please update this template accordingly, and make sure you have observed the project guidelines. Details Walkthrough: not written Interior Remastered Images: not added |
|
|||
|---|---|---|---|
| # of Zones | 2 | ||
| Occupants | |||
| Black Bow Bandits, Marauders (2 boss-level Black Bow Bandits) |
|||
| Important Treasure | |||
| 1 boss-level Chest 02 | |||
| Console Location Code(s) | |||
| RockmilkCaveExterior, RockmilkCave, RockmilkCave03 | |||
| Region | |||
| Blackwood | |||
| Location | |||
| North of Leyawiin, west of the Green Road | |||
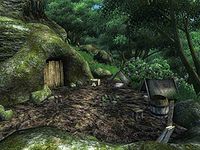
Rockmilk Cave is a medium-sized cave between Bravil and Leyawiin containing marauders and bandits (quest-related). It contains two main zones: Rockmilk Cave and Rockmilk Haven. Technically, the tent in Rockmilk Haven is a third zone, named Rockmilk - Blackbow Camp, but in this article the tent's contents have been included in Rockmilk Haven.
Related Quests[edit]
- Black Bow Bandits: Tag along with Mazoga the Orc to track down and kill Black Bow Bandits (non-journal).
Notes[edit]
- This cave contains 13 Cairn Bolete plants and 14 Wisp Stalk plants.
- The occupants of the caves are both Marauders and Black Bow Bandits, who hate each other and will fight each other to the death.
- All of the Black Bow Bandits carry Black Bows which can be sold to Count Marius Caro for 100 gold each, provided that you have completed the Knights of the White Stallion quest.
- When you enter the cave on the day Mazoga is there (Middas), she will spawn in the second room, right in between some Bandits and Marauders.
- In the Construction Set, there are four zones associated with Rockmilk Cave. However, the zone RockmilkCave02 is not accessible in-game.
-
The Unofficial Oblivion Patch, version 3.1.0, addresses this issue. Some of the changes include tidying up and renaming the missing cell and connecting it with the rest of the dungeon.
-
Exterior[edit]
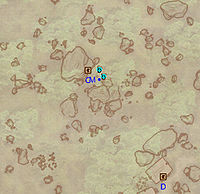
- The exterior is located at coordinates: Tamriel 19, -27
- This location's map marker (M on map) is named Rockmilk Cave (editor name RockmilkCaveMapMarker). The entrance door is NW of the marker, 20 feet away.
- The following plants can be found near the entrance: 14 Clouded Funnel Cap plants, 2 Grape vines, and 2 Tomato plants
- 2 bedrolls are at locations b on map
Zone 1: Rockmilk Cave[edit]
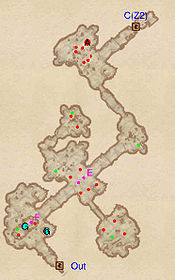
You enter this zone at the entrance (Out) and connect to the second part of Rockmilk Cave through door C. The main obstacle getting through the cave is the unusually large number of enemies, although (as mentioned in the notes) the enemies will tend to spend their time fighting each other.
In the first room you will find a marauder fighting a bandit, as well as a Cave In trap (F), two dead bandits (G), a locked minor loot chest and a bedroll (b). In the second room two marauders (one of them an archer) and three bandits face off, separated by two Swinging Mace traps (E). A locked minor loot chest is nearby. From here you can access two smaller rooms to the north and south. The first of these contains a marauder battlemage, a bandit, a minor loot chest and a novice calcinator, while the second hosts two bandits, a marauder battlemage and a minor loot chest. Once you're done, take the passage heading northeast, loot the chest along the way and you will emerge in the last room. Here four bandits (one of whom boss level, at A) are fighting 2-3 marauders (one of them an archer).
Occupants:
- 1 boss-level Black Bow Bandit at location A on map
- 10 archer Black Bow Bandits
- 2 Marauder Battlemages
- 2 archer Marauders
- 3-4 melee Marauders
Treasure:
- 1 Chest 01 (locked)
- 2 Chests 02 (1 locked)
- 1 Chest 03
- 1 Chest 04
- The other following items will always be found: 1 Novice Calcinator, 1 Arrowroot, 1 Cairn Bolete Cap, and 2 Iron Arrows
- The following plants will always be found: 13 Cairn Bolete plants and 12 Wisp Stalk plants
Traps:
- 1 Cave In trap at location F on map, triggered by approaching the trap.
- 2 Swinging Mace traps at E, both triggered at the same time as you enter the cavern.
Doors and Gates:
- There are two doors in/out of this zone
- 1 door (at Out) leads outside
- 1 door (at C) leads to the zone Rockmilk Haven
Other:
- 2 Dead Bandits (wearing light boots and cuirass, 25% chance poison) at locations G on map
- 1 bedroll at b
Zone 2: Rockmilk Haven[edit]
When entering from door C you will arrive on a ledge overlooking the main room, with a marauder archer nearby. Below are five bandits (one of whom boss level, at A) fighting four marauders in a heated battle. The tunnel to the east leads down to the room and hosts a minor loot chest. When the battle calms down, head down: you will find five tents with bedrolls (b) around a campfire, a minor loot chest, plenty of overturned furniture and some food (E).
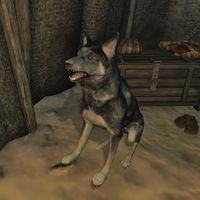
In the southeastern corner is a larger tent, which is its own small zone and is entered via door D. Inside you will find Pumpkin guarding a boss chest, a bedroll and a table. On top of the latter are an emerald, a flawed ruby, two flawed topazes, two lockpicks and some food.
Occupants:
- 1 boss-level Black Bow Bandit at location A on map
- 4 archer Black Bow Bandits
- 1 Marauder Battlemage
- 2 archer Marauders
- 2 melee Marauders
- Dog named Pumpkin (the Black Bow Bandit boss' dog; non-respawning; found inside the boss' tent). Pumpkin will generally not attack the player.
Treasure:
- 1 boss-level Chest 02 (Bandit variety) inside the tent
- 1 Chest 03
- 1 Chest 04
- The following ingredients will always be found: 1 Carrot, 1 Corn, 1 Onion, 1 Potato, 1 Pumpkin, 1 Rice, 1 Sweetroll, 1 Tomato, and 2 Venison
- The following plants will always be found: 2 Wisp Stalk plants
- Some of the above items are clustered at location E: 1 Carrot, 1 Corn, 1 Pumpkin, 1 Tomato, and 1 Venison
- In addition, inside the tent there are: 1 Emerald, 1 Flawed Ruby, 2 Flawed Topazes, 2 Lockpicks, 1 Leek, and 1 Venison
Doors and Gates:
- There are two doors in/out of this zone
- 1 door (at C) leads to the zone Rockmilk Cave
- 1 door (at D) provides access to the tent (named Rockmilk - Blackbow Camp)
Other:
- 5 bedrolls at locations b on map outside the tent, and 1 bedroll inside the tent


