Oblivion:Silorn
|
|||
|---|---|---|---|
| # of Zones | 3 | ||
| # of Welkynd Stones | 8 | ||
| # of Varla Stones | 3 | ||
| Occupants | |||
| Necromancers, Undead (1 boss-level Necromancer) |
|||
| Important Treasure | |||
| 1 boss-level Ayleid Coffer 2 boss-level Ayleid Reliquaries |
|||
| Console Location Code(s) | |||
| SilornExterior, Silorn, Silorn02, Silorn03 | |||
| Region | |||
| West Weald | |||
| Location | |||
| Southeast of Skingrad | |||
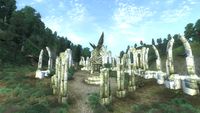
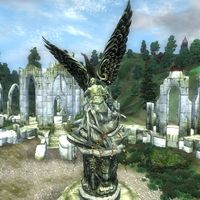
Silorn is a medium-sized Ayleid ruin southeast of Skingrad containing necromancers (quest-related). It contains three zones: Silorn, Silorn Sedorseli, and Silorn Buroseli.
Related Quests[edit]
- Ambush: Oversee a contingent of Battlemages in their fight against the Necromancers and retrieve a unique Black Soul Gem from an old "friend".
Notes[edit]
- This ruin is inaccessible until you reach stage 30 or higher of the related quest.
Exterior[edit]
- The exterior is located at coordinates: Tamriel -11, -4
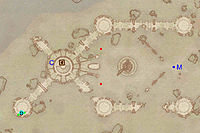
- This location's map marker (M on map) is named Silorn (editor name SilornMapMarker). The entrance door is W of the marker, 230 feet away.
- 2 Necromancers (quest-specific; non-respawning) are near the entrance
- The following plants can be found near the entrance: 8 Columbine plants, 1 Dragon's Tongue plant, 4 Flax plants, 5 Lady's Smock plants, 6 Nightshade plants, 2 Domica Redwort plants, and 4 Viper's Bugloss plants
- 1 bedroll is at location b on map
- 1 Chest 01 is near the bedroll
- 1 Chest 04 is near the bedroll
- 1 Ayleid Cask 02 is on the round platform at the northeast corner of the ruin (not shown on map)
Zone 1: Silorn[edit]
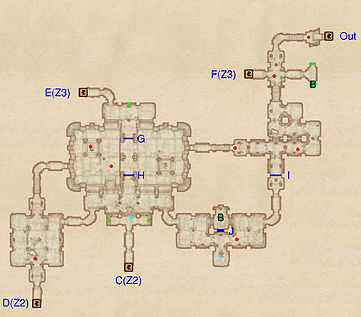
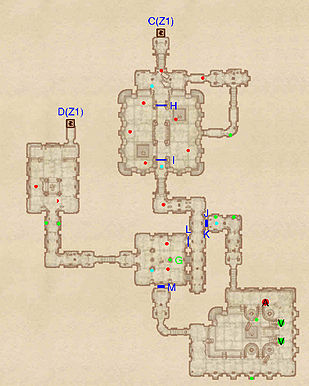
Immediately upon entering, you will encounter two Necromancers patrolling the first area, so be prepared. Follow the path and battle your way past another two necromancers until you reach an intersection. The iron gate to the south (I) has a Hard lock, but provides quick access to the boss-level Ayleid Coffer at B, which is behind a Hidden Door (J) opened by the nearby push button (cyan dot on map). Alternatively, the Coffer can be reached from the main central room, though taking this route will net you a battle against two Necromancers on the lower floor. Regardless of your choice, once you arrive on the upper level of the central room make sure to loot the four Welkynd Stones from the nearby pedestals. As the Iron Gates at H and G cannot be opened from this side, take the southwestern tunnel instead, which leads to the door (D) to Silorn Sedorseli, guarded by another necromancer. If your Acrobatics skill is at least 40, it is possible to jump around the gates and access Silorn Buroseli without going through Silorn Sedorseli.
When you return from Silorn Sedorseli through door C, proceed to the elevated balcony which overlooks the central room. Activate the push button (cyan dot on map) nearby, which will open the gates at G and H. Loot the balcony's Ayleid Cask and Chest, jump down and cross the bridge, which leads you to door E to Silorn Buroseli.
When you emerge from Silorn Buroseli from door F, you will be on a stone ledge just above the very first corridor when you entered. Cross it and loot the boss-level chest at B and minor loot chest nearby. Finally, jump off and head back to the entrance.
Occupants:
- 1 Necromancer (quest-specific; non-respawning)
- 7 Necromancers
Treasure:
- 1 boss-level Ayleid Coffer (Necromancer variety; locked) at location B on map
- 1 boss-level Ayleid Reliquary (Necromancer variety) at B
- 2 Ayleid Casks 01 (1 locked)
- 2 Restoration Ayleid Chests
- 4 Welkynd Stones
Doors and Gates:
- There are five doors in/out of this zone
- 1 door (at Out) leads outside
- 2 doors (at C and D) lead to the zone Silorn Sedorseli
- 2 doors (at E and F) lead to the zone Silorn Buroseli (F locked)
- 1 Gate at I (locked)
- 1 Hidden Door at J
- 1 Iron Gate (opened remotely) at H
- 1 Iron Gate (opened remotely) at G
Zone 2: Silorn Sedorseli[edit]
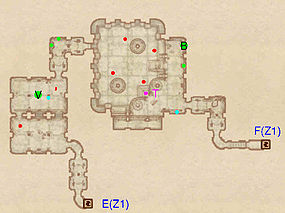
Your main objective in this zone is reaching door C back to an inaccessible area in the first zone. A hefty amount of treasure makes it worthwhile exploring a bit further though, so proceed through the first room, dispatch the one or two necromancers nearby and loot the Ayleid Cask and chest in the hallway just ahead. Two Necromancers await in the next big room, as well as the zone's four Welkynd Stones, a minor loot chest and a full set of Novice alchemical equipment (E). Locate the push block (cyan dot on map) on the southern pillar, watch the wall at M open and head down into the southeastern room, which is rather large and has a pool of water in the middle. The pool contains nothing but a restoration chest, so stay ashore for now, fight the boss-level Necromancer (A) and claim the two Varla Stones at V. Another minor loot chest can be found in one of the alcoves on the south wall.
Take the northern tunnel, loot the two nearby chests and step on the stone pressure plate, which will lower the two walls at J and K. After dispatching another necromancer, head down the stairs and you will emerge in another water-filled room. The water contains nothing but slaughterfish and an underwater tunnel which contains a minor loot chest, so either take the tunnel or step on the stone pressure plate nearby which will lower the gates at I and H. After fighting another necromancer and an undead enemy, head north up the stairs and return to Silorn through door C.
Occupants:
- 1 boss-level Necromancer at location A on map
- 5-6 Necromancers
- 1 Undead
- 5 Slaughterfish
Treasure:
- 2 Varla Stones at locations V on map
- 1 Ayleid Cask 01
- 2 Ayleid Casks 02 (1 locked)
- 1 Chest 03
- 4 Restoration Ayleid Chests (2 locked)
- 4 Welkynd Stones
- The following alchemy equipment will always be found: 1 Novice Alembic, 1 Novice Calcinator, 1 Novice Mortar & Pestle, and 1 Novice Retort
- Some of the above items are clustered at location G: 1 Novice Alembic, 1 Novice Calcinator, 1 Novice Mortar & Pestle, 1 Novice Retort, 1 Restoration Ayleid Chest, and 1 Welkynd Stone
Doors and Gates:
- There are two doors (at C and D) in/out of this zone, both leading to the zone Silorn
- 1 Gate at L (locked)
- 3 Hidden Doors at J, K, and M
- 1 Iron Gate (opened remotely) at I
- 1 Iron Gate (opened remotely) at H
Zone 3: Silorn Buroseli[edit]
Upon entering from door E, dispose of the 1-2 necromancers in the first room, then locate the push button (cyan dot on map) on a pillar in the second room and claim the Varla Stone from the pedestal at V. If you let him flee during the Ambush quest, Falcar will be in the next hallway, right near an Ayleid Cask and chest; dispose of him and claim the Colossal Black Soul Gem from his corpse and proceed forward. The final room is big and is guarded by four Undead and an unfriendly Dark Welkynd Stone trap at T. Run past the enemies and up the stairs, then hit the push button on the southern wall (cyan dot on map) which will toggle the trap on and off. Claim the goods from the boss-level Ayleid Reliquary at B and the nearby minor loot chest before making your way to door F, leading back to the first zone, Silorn.
Occupants:
- 1-2 Necromancers
- 4 Undead
Treasure:
- 1 boss-level Ayleid Reliquary (Necromancer variety; locked) at location B on map
- 1 Varla Stone (in a Varla Stone Cage) at V
- 1 Ayleid Cask 01 (locked)
- 2 Restoration Ayleid Chests
Traps:
- 1 Dark Welkynd Stone trap at location T on map.
Doors and Gates:
- There are two doors (at F and E) in/out of this zone, both leading to the zone Silorn
